Wednesday, June 13, 2012

Family Coat Hanger

Today I created a home made coat hanger for my home.

What you need:

*Table Top from a coffee table or a flat board
*Picture Fames with Fave Pics
*Old or new cupboard knobs
*Velcro Pieces with sticky back (will not work with heavy frames, so tack on with small penny nails)
*Favorite Saying (quilled and framed)


Beginning:

First I "quilled" the word "family" onto a piece of paper like so:

In order to do this you need to cut lengths of paper 1/4 of an inch wide or buy pre-cut quilling paper from a craft store. I prefer to cut it my self as this way cheaper and I feel more pride in doing things the long way.

Draw or print out the design, I drew mine.  (Remember to do just the out side part of the letters) the inner design is the fun free for all.

Wrap the paper into a tight circle and use a glue stick on the edge. If you need straight lines do not wrap.

Gently place the edge of the paper over your stencil and apply a little pressure as you go.

Yay, you have made a time consuming design.

There are many tools and books for this, I however choose to do my own drawings and cut my own paper and not use tools.


NeXt:

I went and bought 5 frames from the Dollar Tree, accounting for the size of the pics I wanted to use. I also found the 7 knobs at the Dollar Tree, (rare find, especially when you are looking for some like I was) I originally intended to go to the Home Depot for these.

Fill your frames with your pics. Drill holes for the knobs, I did mine by hand with a screw and a manual screwdriver, an actual drill would have been way useful and saved some time.

Place screws through predrilled holes and put the knobs on.

I used Velcro Dots on the back of the picture frames. Placed both sides on so they would be in the correct spots when I put them on the table top.


Finished Product:

This is what it will look like when it is done:     (will get a better pic soon)


Now you have a great place to hang scarves, purses, jackets and more, but you give it a families loving touch.

Follow Me on Pinterest

Thursday, May 17, 2012

Cakes, Cardboard and more...

All of these projects were fun and a great way to express myself. If there are any that you are interested in doing yourself just leave a comment and I will get back to you.
First Attempt at Alien Cupcakes . They were a total hit for the bake sell at work. All proceeds went to the Vanessa Behan Crisis Nursery.


Second Attempt at Cupcakes, Theme: The circus, Lions and Monkeys. More pics to come for this. It was for my sons 1st birthday.


First Attempt at a tier cake. Theme: Toy Story 2, for my sons 2nd birthday


My son just turned 10 this past weekend. He picked a baseball themed birthday party. This is also his first year in Little League and he plays for the White Sox. This is the cake his Step Mom (Alishia Owens) and I made for him. She baked, and did the first few layers of fondant, and I did the detail work.

Over a hundred cookies for a Christmas party at work. Yikes!

 
 I made these decorative boxes out of construction paper, shipping boxes, chalk, a sharpie, and shipping tape. I have diapers and wipes in one and Wii stuff in the other, they are a decorative way to hide clutter on a shelf.


These are callages of photos, they are also made with cardboard, construction paper, brads and packaging tape. This is a fun project to do with friends, family, and great for kids.


This is a table I had painted to match some hanging picture frames I made, I have them on here but they are the unfinished version. They are now painted the same colors as the table.


These are the frames I was talking about above, It is amazing all the cool projects that can be made with yarn, cardboard, a little paint and tape.


Here are a couple of Halloween projects from 2011. The "Child Eating Porch Pumpkin" and My sons "Marvin the Martian" costume.


And Last but not least, I get that some people are against body art, butI am proud to say that these are my first works of art on the human body, I have more pics of tatoos that are much more feminine but at this moment this is all I can find.


This first one is a cover up.


This second one is a tribal dragon.


This 3rd one is a tribal of my own design for Jeff Y.


Nursery under $50.00 less than 24 hours (day 2)

Day Two:
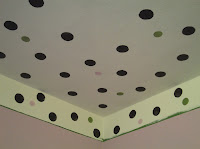
We placed a border of tape 5" from the ceiling all the way around the room.
I painted the top border and the ceiling with the same white as the chair rail using the Shur Line tool.
This tool is great for wall corners as well as ceiling borders. The corners proved to be an issue due to the shape of the tool and our distance from the ceiling. Otherwise, this was the most used tool that we purchased.
After the paint dried, I used the same color/sponge combo from the chair rail See (Day 1). She applied the black polka dots to the ceiling, followed by the green, then the pink. The ceiling turned out to be one of my favorite parts of the room.

We then taped 1/2 up from the top of the tape to create a border after the polka dots dried.
Then, I painted the area between the tapes with the black suede paint sample. I used another Shur Line touch up tool, that worked out pretty well.

And once the paint dried, we peeled the two layers of tape off and had a beautiful black stripe! =)


The ceiling was done, as well as both wall borders. However, the light cover did not match. So we polka-dotted that too. =)


With the walls and ceiling done, it was time to move onto the details in the accessories.


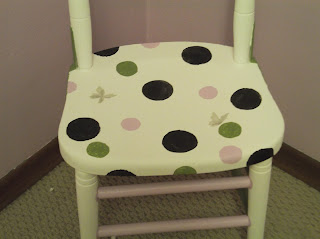
I found out that Alishia had a small wooden chair I decided we were going to use it. First we painted it white. I wanted to bring some of the upper decor to the bottom of the room. So...


We added the infamous polka dots:


Then I painted the front rungs New Violet and the side rungs Scotland Isle Green.


I taped around the edges of the brackets and then painted them green.

I added some of the same butterfly decals also used in the framed collages we made on Day 1.

The completed chair:


I measured and hung the framed collages above the chair rail.

Then I added decals with the words "Faith, Love, and Hope" below, above and below the frames.

THE FINAL TOUCH:

I added five of the same butterflies from the chair rail to random sections of the ceiling. 


With this, the room is complete. All that is left is cleanup and bedding. The baby shower is in 3 days, so hopefully with any luck she will receive the bedding set she is wishing for. =)

Here are two panoramic photos of the whole room we put together for you to get the full effect of the nursery. (Please keep in mind that these are panoramic views, and the lines are actually straight, the camera just makes them look bowed)


So here is a $50.00 baby room make over. Much love and many thanks Alishia for letting me get my creative juices flowing and allowing me to take the wheel and see where my mind would lead me.


 Congratulations Steven and Alishia Owens on your soon to be New Arrival.   
 Under $50.00 and 20 hours


Nursery under $50.00 less than 24 hours (day 1)

This is what the room looked like when we started. The crib and changing table were bought at Walmart as a set for $179.00, and the swing was given to Alishia by a friend.


The wall color is New Violet by Behr. Alishia loves this color. It looks pink and or purple depending on its surroundings and light.


This is my friend Alishia Owens, for her baby shower gift I have  decided to create and decorate a nursery for her. To see her blog page click here.
DAY 1
SHOPPING LIST!!
From the Dollar Tree:
  • 3 white baskets
  • Car sponge
  • Glue sticks
  • Paint brushes
  • Decorative decals (Will label as progress continues)
  • See through white ribbon
  • Solid black ribbon
Grand total: $12.82

From Home Depot:
  • Frog Tape
  • Handi Painter
  • Touch Up Pad (Shur Line)
  • Mini Roller Kit
  • Scotland Isle and Black Suede Behr paint samples 
Grand Total: $22.26

Michaels
  • Sticker Gems
  • 3 Daisy Clips
  •  Scrapbook paper (green butterfly)

Grand Total: $13.80

Overall Grand Total:  $48.88

BASKETS
Before:

 First I colored the sheer white ribbon with a black paint pen that I previously bought.
  
Then I took the ribbon and wove it through the holes in the basket. 

 After that I attached the daisy clip to the front of the basket over the knot.
Final Product! Decorative holders to be used for toys, diapers, wipes, and bath gear. 


BUTTERFLY PLAQUE:


I used a scrap piece of wood, penny nails, paper, hot glue, and a sharpie. I found a different version of this on line and decided to put a little of my own personality into it. I had already assembled this before heading to Alishias' for the week. This is how it looked when I arrived.
Together Alishia and I painted the board Scotland Isle Green and added a butterfly made out of green scrapbook paper (the polka dots were originally white, but I decided to color them with the black paint pen).
We then added a decorative decal (from the dollar tree) that says "In a world where you can be anything, Be yourself."
The paint is the same color, just different lighting. I colored more of the same ribbon from the baskets and made a hanger for the plaque. 


WALL BORDER:
The wall was the new violet color before we started (courtesy of Alishias' first child) First, we used the Frog Tape and taped off a 7 inch (top to bottom) "high" chair rail. 
We then painted the chair rail white with the Shur Line and allowed it to dry. 
   
I cut several different size circles out of the car sponge (two 2" circles, one 1.5" circle, and one 1" circle). We then dipped the 2" sponge into the black suede paint and pressed, pushed and twisted the sponge onto the white border. 


After letting the black dots dry, we used the 1.5" sponge and added the green polka dots approximately 2' apart. (Don't worry, the edges do turn out nicely! Loving Frog Tape right now)

After the green dots dried, we used the 1" sponge and added left over New Violet. We wanted these dots smaller so the violet would not be overwhelming, but still tied in.

The princess sticker will be removed and placed in her older daughters' room. =)

I then taped off 1/2" below the top tape, and 1/2" above the bottom tape. I was unable to get pics of this as I was taping the border and unfortunately do not have rubber stretchable arms.
After taping, I painted the 1/2" gap on the top and bottom with the black suede paint.
The sun went down so the lighting makes the room look pink in this photo.

After it dried, we peeled the tape off, being sure to pull toward the fresh paint.
We made butterflies out of construction paper and tissue paper that I had laying around from years ago. 
 The very bottom layer is made of green rubber shelf liner that she also had laying around. We used the glue sticks to glue them to the wall around the chair rail. The glue sticks are used because it won't damage the wall and can be removed later and the dried glue can be washed off with warm water. 

And the chair rail is now done. =)
THE ADDITION OF THE PLAQUE:
We used a white screw in hook that came in a kit that I already had bought at the Dollar Tree months ago. We placed the plaque mid way between the chair rail.

Day one was a total success!! We got a lot accomplished, and this only took about 5 hours to complete.

HERE'S THE PANORAMIC VIEW:

With an hour to kill, we put together some framed collages with two of the three remaining decals. We drew out polka dots with a sharpie on plain computer paper that Alishia already had on hand. We then stuck the butterflies on top of the plain computer paper and the polka dot paper. I hot glued handmade bows onto the center of the frames to incorporate the New Violet color.